
Download Project (Full Project)
Step 1:
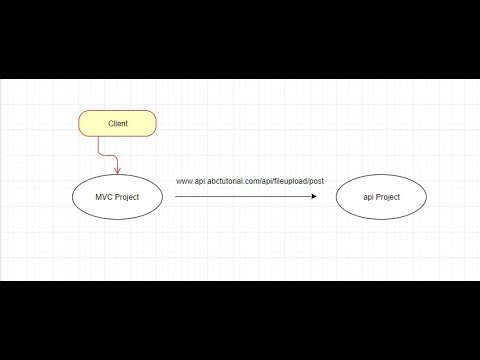
In this tutorial I will show how to use API project into asp.net web application. First open visual studio and create a asp.net web application and then select API then click ok. Then create an API project for you. This project responsible to save the file project won location. You also change file save location. When file or image upload the application then web API project response the return in MVC project. Now given bellow the API project controller code:
using System;
using System.Collections.Generic;
using System.Linq;
using System.Net;
using System.Net.Http;
using System.Web;
using System.Web.Http;

namespace WebAPI.Controllers
    public class ValuesController : ApiController
    {
        public HttpResponseMessage Post()
        {
            var httpRequest = HttpContext.Current.Request;
            if (httpRequest.Files.Count < 1)
            {
                return Request.CreateResponse(HttpStatusCode.BadRequest);
            }
            //var name = httpRequest.Params["name"];
            foreach (string file in httpRequest.Files)
            {
                var postedFile = httpRequest.Files[file];
                var filePath = HttpContext.Current.Server.MapPath("~/" + postedFile.FileName);
                postedFile.SaveAs(filePath);
            }
            return Request.CreateResponse(HttpStatusCode.Created);
        }
    }
}
Step 2:
Now create a web application project and select MVC then click ok. Then create a web application project for you. This project responsible to send the data to API project and API project save the data in memory. When post request in MVC project then MVC project pass the request in API project. Given bellow the MVC controller code:
using System;
using System.Collections.Generic;
using System.IO;
using System.Linq;
using System.Net.Http;
using System.Web;
using System.Web.Mvc;
using System.Threading.Tasks;

namespace HighChart.Controllers
{
    public class WebAPIController : Controller
    {
        // GET: WebAPI
        public ActionResult Index()
        {
            return View();
        }
        [HttpPost]
        public ActionResult Index(HttpPostedFileBase file)
        {
            using (var client = new HttpClient())
            {
                using (var content = new MultipartFormDataContent())
                {
                    MemoryStream target = new MemoryStream();
                    file.InputStream.CopyTo(target);
                    byte[] Bytes = target.ToArray();

                    file.InputStream.Read(Bytes, 0, Bytes.Length);
                    var fileContent = new ByteArrayContent(Bytes);
                    fileContent.Headers.ContentDisposition = new System.Net.Http.Headers.ContentDispositionHeaderValue("attachment");
                    content.Add(fileContent);
                    var requestUri = "http://localhost:23931/api/values/";
                    var result = client.PostAsync(requestUri, content).Result;

                    if (result.StatusCode == System.Net.HttpStatusCode.Created)
                    {
                        ViewBag.Success = result.ReasonPhrase;
                    }
                    else
                    {
                        ViewBag.Failed = "Failed" + result.Content.ToString();
                    }

                }
            }
            return View();
        }
    }
}
Step 3:
View responsible for pass the data into controller using the “rezor” syntax. This is post method and also passes the image or file. Given bellow the view code:
@{
    ViewBag.Title = "Index";
}
<h2>Index</h2>
<div class="jumbotron">
@using(Html.BeginForm("Index", "WebAPI",FormMethod.Post,new {enctype="multipart/form-data" }))
{
<table border="0" cellpadding="0" cellspacing="0">
    <tr>
        <td>File Attachment</td>
        <td><input type="file" name="file" multiple="multiple"/></td>
    </tr>
    <tr>
        <td><input type="submit" value="Send" /></td>
    </tr>
</table>
}
</div>
Step 4:
Now build and run the project.
About Teacher
Comments