
Download Project (Full Project)
Crystal Report Demo
Crystal Report Demo | Source Code Link
Step-1
In this tutorial we create crystal report. First open visual studio then create ASP.NET MVC project, give the name of the project and also you can change your solution name then click ok. Select MVC template and click ok. It’s create a project for you. It’s called default project.
Step-2
Now Open SQL server management studio then create a database and under database create a table the table have some property. some demo data insert into database.
Step-3
Create a folder data or you can use model folder for connect ado.net data model. This ADO.NET creates to connection with SQL Sarver to fetch the data. It also create .demx file to see the table diagram.
Step-4
Now Given bellow the controller code:
using CrystalDecisions.CrystalReports.Engine;
using CrystalReportDemo.Models;
using System;
using System.Collections.Generic;
using System.IO;
using System.Linq;
using System.Web;
using System.Web.Mvc;

namespace CrystalReportDemo.Controllers
{
    public class HomeController : Controller
    {
        MVCTutorialEntities db = new MVCTutorialEntities();
        public ActionResult EmployeeList()
        {
            return View(db.EmployeeInfoes.ToList());
        }

        public ActionResult exportReport()
        {
            ReportDocument rd = new ReportDocument();
            rd.Load(Path.Combine(Server.MapPath("~/Report"), "CrystalReport.rpt"));
            rd.SetDataSource(db.EmployeeInfoes.ToList());
            Response.Buffer = false;
            Response.ClearContent();
            Response.ClearHeaders();
            try
            {
                Stream stream = rd.ExportToStream(CrystalDecisions.Shared.ExportFormatType.PortableDocFormat);
                stream.Seek(0, SeekOrigin.Begin);
                return File(stream, "application/pdf", "Employee_list.pdf");
            }
            catch
            {
                throw;
            }
        }


    }
}
Step-5
Now Given bellow the EmployeeList.cshtml or view code:
@model IEnumerable<CrystalReportDemo.Models.EmployeeInfo>

@{
    ViewBag.Title = "EmployeeList";
}

<h2>EmployeeList</h2>

<p>
   <a class="btn btn-success" href="@Url.Action("exportReport")">Download Report</a>
</p>
<table class="table">
    <tr>
        <th>
            @Html.DisplayNameFor(model => model.EmployeeId)
        </th>
        <th>
            @Html.DisplayNameFor(model => model.EmployeeName)
        </th>
        <th>
            @Html.DisplayNameFor(model => model.Email)
        </th>
        <th>
            @Html.DisplayNameFor(model => model.Phone)
        </th>
        <th>
            @Html.DisplayNameFor(model => model.Experience)
        </th>
        <th></th>
    </tr>

@foreach (var item in Model) {
    <tr>
        <td>
            @Html.DisplayFor(modelItem => item.EmployeeId)
        </td>
        <td>
            @Html.DisplayFor(modelItem => item.EmployeeName)
        </td>
        <td>
            @Html.DisplayFor(modelItem => item.Email)
        </td>
        <td>
            @Html.DisplayFor(modelItem => item.Phone)
        </td>
        <td>
            @Html.DisplayFor(modelItem => item.Experience)
        </td>
        <td>
            @Html.ActionLink("Edit", "Edit", new { /* id=item.PrimaryKey */ }) |
            @Html.ActionLink("Details", "Details", new { /* id=item.PrimaryKey */ }) |
            @Html.ActionLink("Delete", "Delete", new { /* id=item.PrimaryKey */ })
        </td>
    </tr>
}

</table>
Step-6
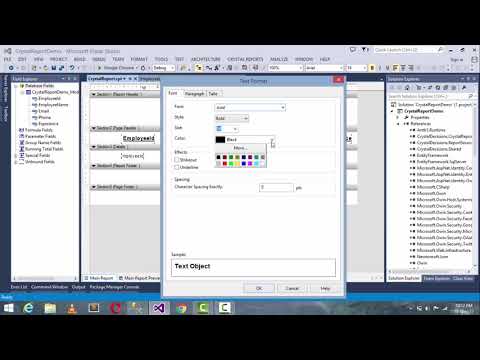
When we run the project then we can see the list of employee. Now create a button name like export report then the button call the method “exportReport” this method responsible to download report also we have to select reporting from add option then its configure.
About Teacher
Comments