
Registration Form With Image Upload In MVC | Using Jquery Ajax | Part-1
Upload And Display Image In MVC | Registration With Image | Part-2
How To Create Login Page In ASP.NET MVC | Using Jquery Ajax | Login & Registration Demo | Part-3
ASP.NET MVC form authentication with role provider
Download Project (Full Project)
Step-1
In this part i will show how to registration form with image upload in mvc. Now Open visual studio then create ASP.NET Web application. You can change project name and solution name. Then select MVC and click ok. Visual studio create a default project for you. Now add sql server database into the project. Give the name of the database. Now create table into the database. Now connect database to our project. By add ADO.NET entity Data model . given the name of the model. Select ER diagram then click next. Select connection string then click next. Now select all tables and click next. We can see the .edmx file now build the solution. Now add new controller into controller folder. Name as product. Controller source code given bellow:
public class ProductController : Controller
    {
        OnlineShopEntities db = new OnlineShopEntities();
        public ActionResult AddNewProduct()
        {
            return View(db.Products.ToList());
        }
        [HttpPost]
        public ActionResult SaveData(Product item)
        {

            if (item.ProductName != null && item.UploadImage != null)
            {
                string fileName = Path.GetFileNameWithoutExtension(item.UploadImage.FileName);
                string extension = Path.GetExtension(item.UploadImage.FileName);
                fileName = fileName + DateTime.Now.ToString("yymmssff") + extension;
                item.PicUrl = fileName;
                item.UploadImage.SaveAs(Path.Combine(Server.MapPath("~/AppFile/Images"),fileName));
                db.Products.Add(item);
                db.SaveChanges();
            }
            var result = "Successfully Added";
            return Json(result, JsonRequestBehavior.AllowGet);
        }
    }
Step-2
This Model just represents the data on view and save data using this model. Model source code given bellow:
public partial class Product
    {
        public int ProductID { get; set; }
        public string ProductName { get; set; }
        public Nullable<decimal> Price { get; set; }
        public string PicUrl { get; set; }

        public HttpPostedFileBase UploadImage { get; set; }
    }
Step-3
Now create a view. Now design the view using html. Write some code pass form data from view to controller and save it in database. This code are Ajax post by using JavaScript. Now create a method into mvc controller name as “SaveData()”. Now create a database object for access the table. Under the product model write a property which is responsible for image handling. And save method receive an object. Now write the code receive data from view and save all data and image in database. View source code given bellow:
@model IEnumerable<WorkWithImage.Models.Product>
@{
    ViewBag.Title = "Add New Product";
}

@* ########### Add New Product Form Design ############## *@

<div class="container">
    <h2 class="text-center">Add New Product</h2>
    <div class="row">
        <div class="col-md-6">
            <form id="AddProduct" method="post" enctype="multipart/form-data" onsubmit="return AjaxPost(this)">
                <label>Title</label><br />
                <input type="text" id="ProductName" name="ProductName" class="form-control" /><br />

                <label>Price</label><br />
                <input type="number" id="Price" name="Price" class="form-control" /><br />

                <label>Image</label><br />
                <input type="file" id="UploadImage" name="UploadImage" class="form-control" /><br />
                <button class="btn btn-danger">Add</button>
            </form>
        </div>
    </div>
</div><br /><br /><br /><br />
@* ########### Display All Product ############## *@
<div class="container">
    <h2>Product List</h2>
    @foreach (var item in Model)
    {
        double price = Convert.ToInt32(@item.Price);
        <div class="col-md-3" style="margin-bottom:25px">
            <div class="thumbnail">
                <div class="img-responsive" style="margin-bottom:20px">
                    <img src="~/AppFile/Images/@item.PicUrl" height="350" width="240" />
                </div>
                <div class="caption" style="border-top:3px solid #808080">
                    <h4><a href="#">@item.ProductName</a></h4>
                    <h3>@price.ToString("F2")$</h3>
                </div>
            </div>
        </div>
    }
</div>

    @* ###########
        Pass Add New Product Form Data From View to Controller
        For Save It In Database
    ############## *@

<script>
    function AjaxPost(formData) {
        var ajaxConfig = {
            type: "POST",
            url: "/Product/SaveData",
            data: new FormData(formData),
            success: function (result) {
                alert(result);
                window.location.href = "/Product/AddNewProduct";
            }
        }
        if ($(formData).attr('enctype') == "multipart/form-data") {
            ajaxConfig["contentType"] = false;
            ajaxConfig["processData"] = false;
        }
        $.ajax(ajaxConfig);
        return false;
    }
</script>
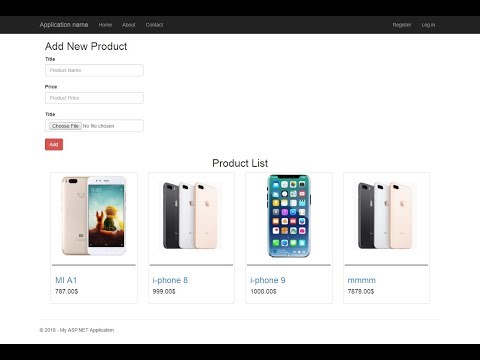
Step-4
Now run the project.
About Teacher
Comments