
Part-0 (introduction ): ecommerce using ASP.NET MVC | ecommerce website using ASP.NET JQUERY AJAX JSON Bootstrap
Part-1: Ecommerce website design using Bootstrap| Building an Ecommerce website| ASP.NET MVC
Part-2: Ecommerce website design using HTML, CSS, Bootstrap, JavaScript | ASP.NET MVC
Part-3: Ecommerce DataBase design in SQL Server | ASP.NET MVC | JQUERY Ajax Json
Part-4: Ecommerce website Entity Framework data model integration | ASP.NET MVC | JQUERY Ajax Json
Part-5: Repository pattern in eCommerce project | ASP NET MVC | C#
Part-6: Ecommerce Dashboard or admin using Bootstrap CSS | ASP.NET MVC
Part-7: eCommerce Add and Edit Category into Admin Panel using ASP.NET MVC | Jquery
Part-8: eCommerce Add and Edit Product into Admin Panel using ASP.NET MVC | Jquery
Part-9: eCommerce Products Load and File upload ASP.NET MVC | Razor Dropdown
Part-10: eCommerce Product Search using Store Procedure Entity Framework | ASP.NET MVC
Part-11: eCommerce Paging Filtering with Entity Framework using ASP.NET MVC | Razor Paging
Part-12: eCommerce Product Add to Shopping Cart in ASP.NET MVC | Dynamic Shopping Cart ASP.NET
Part-13: eCommerce Product Remove from Shopping Cart in ASP.NET MVC | Dynamic Shopping Cart ASP.NET
Part-14: eCommerce Manage Duplicate Entry Shopping Cart in ASP.NET MVC | Dynamic Shopping Cart
Part-15: eCommerce Checkout manage in ASP.NET MVC | Razor | Jquery
Part-16: eCommerce PayPal payment gateway integration in ASP.NET MVC|Free payment gateway
Part-18(Final): eCommerce PayPal Payment complete using ASP.NET MVC | Payment Gateway in asp.net
Part-17: eCommerce PayPal Payment Logic implementation in ASP.NET MVC | using C#
Download Project (Full Project)
Step-1
In this Part I will use ADO.Net, first create a new folder given name “DAL” under solution explorer. Then go to add option new Item->data->select->Ado.Net Entity Data Model->Given model name then Click Add. Then Select->EF Designer form database then Next. Click new connection then give the Sarver name from SQL management studio or if this is local server then you can write “.” Then you can select or given your database name-> click “Test Connection” button. If it is ok then click ok Button. You can change “webConfig” file Name or Direct Next button click. Select all tables also you can change model namespace then finish button. Now we can see “.edmx” file are added and now build the project.
Step-2
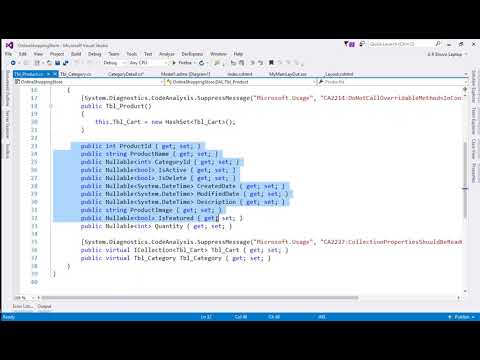
Then first create a class into Model Folder as “CategoryDetail” and under class write property and also validation code. Now create ProductDetail class and write property and also validation code. This model are represent the data. Given bellow source code:
using System;
using System.Collections.Generic;
using System.ComponentModel.DataAnnotations;
using System.Linq;
using System.Web;
using System.Web.Mvc;

namespace OnlineShoppingStore.Models
{
    public class CategoryDetail
    {
        public int CategoryId { get; set; }
        [Required(ErrorMessage ="Category Name Requird")]
        [StringLength(100, ErrorMessage ="Minimum 3 and minimum 5 and maximum 100 charaters are allwed", MinimumLength =3)]
        public string CategoryName { get; set; }
        public Nullable<bool> IsActive { get; set; }
        public Nullable<bool> IsDelete { get; set; }
    }

    public class ProductDetail
    {
        public int ProductId { get; set; }
        [Required(ErrorMessage ="Product Name is Required")]
        [StringLength(100,ErrorMessage = "Minimum 3 and minimum 5 and maximum 100 charaters are allwed",MinimumLength =3)]
        public string ProductName { get; set; }
        [Required]
        [Range(1,50)]
        public Nullable<int> CategoryId { get; set; }
        public Nullable<bool> IsActive { get; set; }
        public Nullable<bool> IsDelete { get; set; }
        public Nullable<System.DateTime> CreatedDate { get; set; }
        public Nullable<System.DateTime> ModifiedDate { get; set; }
        [Required(ErrorMessage ="Description is Required")]
        public Nullable<System.DateTime> Description { get; set; }
        public string ProductImage { get; set; }
        public Nullable<bool> IsFeatured { get; set; }
        [Required]
        [Range(typeof(int), "1","500",ErrorMessage ="Invalid Quantity")]
        public Nullable<int> Quantity { get; set; }
        [Required]
        [Range(typeof(decimal),"1","200000",ErrorMessage ="invalid Price")]
        public Nullable<decimal> Price { get; set; }
        public SelectList Categories { get; set; }
    }
}
Step-3
Again add class into Model Folder as “Shopping” and and under class write property and also write validation. This model represent the Shippingdetail informetion. Given bellow the source code :
using System;
using System.Collections.Generic;
using System.ComponentModel.DataAnnotations;
using System.Linq;
using System.Web;

namespace OnlineShoppingStore.Models
{
    public class Shippingdetail
    {
        public int ShippingDetailId { get; set; }
        [Required]
        public Nullable<int> MemberId { get; set; }
        [Required]
        public string Adress { get; set; }
        [Required]
        public string City { get; set; }
        [Required]
        public string State { get; set; }
        [Required]
        public string Country { get; set; }
        [Required]
        public string ZipCode { get; set; }
        public Nullable<int> OrderId { get; set; }
        public Nullable<decimal> AmountPaid { get; set; }
        [Required]
        public string PaymentType { get; set; }
    }
}
Step-4
Save And Build Again.
About Teacher
Comments